The Rowing Catch
The catch is the part of the stroke when the blade enters the water. A rower completes the catch by either lifting the handle slightly or by dropping/unweighing the handle – the handle will rise slightly and the blade will enter the water.
Timing is critical for a good catch; be patient but decisive. You may hear coxswains ask for a fast catch but what you really need to think about is timing – as you start to approach the front edge of your seat, start thinking about dropping the blade into the water.
NOTE
Many people would argue that the catch is the most important part of the stroke because a poor catch will upset the balance of the boat and will lead to a poor drive and finish.
Body Position and Execution
It is important to establish the forward body position early in the recovery and keep it as you slide forward on the seat. When you are just about finished the slide forward, you should be ready to drop the blade into the water.
COACHING TIP
Think about the catch as the last part of the recovery and separate from the drive. If you try to catch and drive at the same time, you will be rushed to get the blade in the water and the body, arms and the oar handle will go up, making the blade go deep. Catch first, with the arms only, leaving the body in position to accept the load from the initial leg drive.
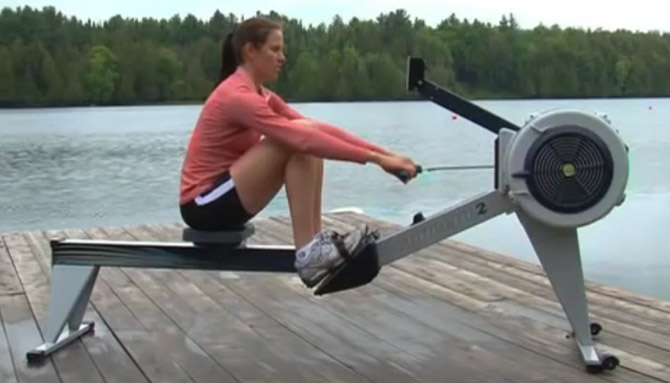
Below is an image of a rower in the catch position.
- Arms and shoulders are relaxed but are extended forward from the lats
- Upper body is angled forward at the hips and is straight from the hips to the top of the head
- Shins are at a 90 degree angle (maybe a little less in a fixed seat boat)
- In a fixed seat boat, you will be sitting on the front edge of the seat
- The blade is fully submerged in the water

Steps for a Perfect Catch
| 1 | During the recovery when you are just about finished your slide on the seat, unweigh the handle allowing it to rise up and allowing the blade to enter the water. Keep your shoulders and back steady, ensuring that you drop the blade when it is at the maximum angle to the boat. |
| 2 | Ensure that you drop the blade just under the surface of the water; there is no need to lift the handle to make it go deeper |
| 3 | Without changing your body angle, engage your core and push on the foot board immediately to lock the blade in the water. |
The Catch Checklist
Use the following checklist to work on specific aspects of the catch as you practice on the erg or in the boat. Choose one or two skills and focus on them for a couple of minutes at a time.
| Catch tips and key points | Yes/No |
|---|---|
| Setup: a good catch depends on a good recovery – extend from the lats and establish a good forward body angle early so you are ready to drop the blade into the water. | |
| Blade: square the blade early during the recovery to ensure that it is ready to drop into the water. | |
| Timing part I: | |
| |
| |
| The catch: | |
| |
| |
| |
| |
| Timing part II: | |
| |
| Blade work: | |
|
NOTE
The hands never stop moving during the full stroke cycle – they move smoothly toward the stern, rise gently for the catch, and move back toward the bow as soon as the legs drive against the footboard.
Common Mistakes
- The cox may say that you are ‘skying’ the blade. ‘Skying’ happens when you lunge forward and or dip your hands down at the catch forcing the blade to go up in the air.
- Slamming the the blade into the water aggressively.
- Lifting the blade into the water with the shoulders and back instead of lifting with the arms only or unweighing the handle.
- Failing to engage your core muscles when the blade is in the water, making it impossible to make a solid connection with the water.
- ‘Rowing it in’ or ‘missing water’ meaning that you start your leg drive, and/or your back swing, before the blade is buried under the surface of the water.
Drills
Use the following drills to develop a good catch:
- Blade placement drills in the catch position
- Pause drills at arms away and body forward so that your body is in the forward position ready for the catch
- Rowing in pairs and fours
See Technique Drills – Top 10 for details on each drill.